Top Level Menu
The "Top Level" menu does not necessarily refer to the menu across the top of the page, the "Top Level" refers to the menu's heirachy within the navigation structure - typically a top level menu contains items such as 'Home', 'About Us', 'Portfolio', 'Contact Us' etc.
To add or edit menu's, click Menu Editor from the Fooshy CMS "Top Level" menu.
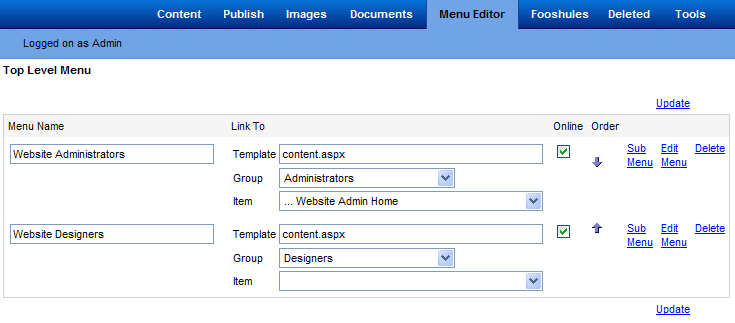
As you can see from the above, the top level of this site contains only 2 menu items "Website Administrators" and "Website Designers". On our website, this menu is indeed at the top of the page. The order in which the menu items appear is determined by the order in which they appear in this list. To alter the order, simply click the up and down arrows alongside the menu items, remembering to click the Update link once you have done.
On the overview page, you can also edit the menu text (by editing the 'Menu Name' field) and also where the menu item links to. The 'Template' field determines which page template to use (typically this is the same for all pages - on this site it is content.aspx). The 'Group' drop down determines which second level menu to load (if applicable) when the Top Level menu item is clicked. Finally the 'Item' drop down determines which content to load.
Before adding a new menu item, it makes sense to create the content item first, that way you can select the appropriate content item from the 'Item' drop down list when you first create the menu item, rather than having to re-edit it once created.
Create A New Menu Item
Firstly, click the link just below the list of existing Menu Items, labelled 'New Top Level Menu', the following page is displayed.
To Menu Item fields should be entered as follows...
- Online - Tick the box if the Menu Item is to be made online immediately
- File Name - Each Menu Item should have a unique filename
- Menu Title - Enter the text you want to appear on the menu
- Display Order - This determines where the menu will appear when ordered with the other menu items. It is advisable to leave this field blank and adjust menu ordering using the overview page as mentioned previously
- Template - The name of the template page to be loaded when clicking the menu item
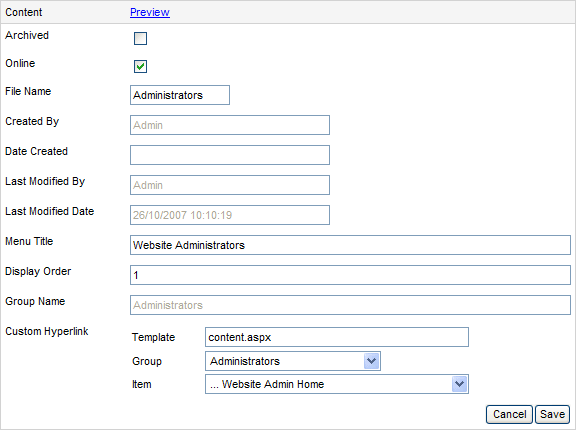
- Group - This is only required if there is a second level menu. Leave the field blank until the Menu Item has been created, at which point, the Group Name field above will automatically be populated, and the new Group will be listed in the drop down list. Select the newly created item in the Group list after the initial save (in the picture above 'Admistrators appeared after the menu item was saved for the first time)
- Item - Select the content item to be displayed on clicking the menu item.
For an example of how 'Groups' work, click the two top menu items on this website - notice how the Group section of the web address changes from "adminstrators" to "designers" and how the sub menu changes.